Legge Moab papir til Epson SC-P900 med Epson Media Installer
Nedenfor følger tekst fra Epson på hvordan legge til f.eks Moab paoir med Epson Media Installer
Creating Custom Paper Settings Using Epson Media Installer
You can create and store up to 30 custom paper settings for use in printing on non-Epson paper or paper that is not supported by the Epson printer driver. You create custom paper settings by copying an existing paper setting, renaming it, and assigning an ICC profile.
Note: You will need an ICC profile to assign to the paper setting. You cannot change custom paper settings created through Epson Media Installer using the printer control panel.
Note: On Mac, Epson Media Installer requires OS X 10.9.x or later to be installed.
- Open the Epson Media Installer software.
- Windows: Open the printer driver by right-clicking the icon for your product in the right side of the Windows taskbar, or click the up arrow and right-click the printer icon, then selecting Printer Settings. Select the Utility tab and click Epson Media Installer.
- Mac: Open the Applications > Epson Software > Epson Utilities folder and double-click Epson Media Installer.
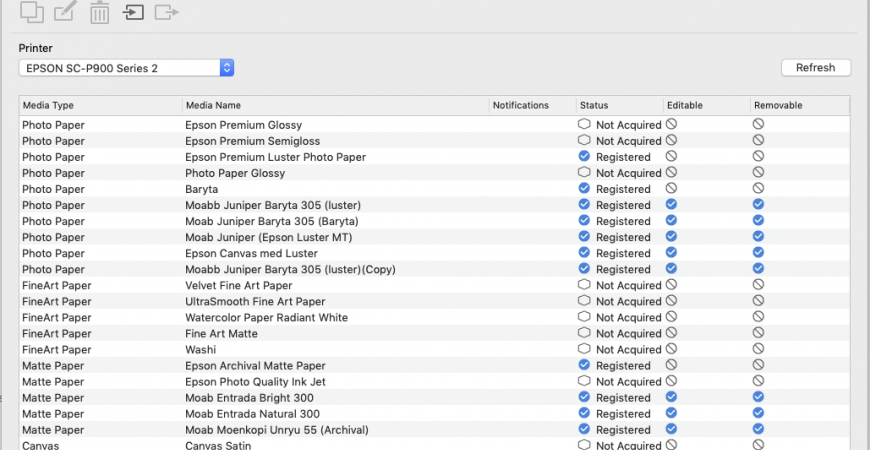
- Click Media Management, if necessary. You see a screen like this:
- Select the paper type you want to use as a base for the new paper setting and click Copy Media.
- Select the new paper setting and click Edit.
- Enter a new name and click Browse to load an ICC profile file to use for the paper setting.
- Click OK and confirm that you want to add the new paper setting to the driver and printer. Note: The new paper type will be assigned as the next open custom paper setting on the printer. There is a limit of 30 custom paper settings.
The new setting is available in your printer driver and on the printer control panel.
Parent topic: Creating Custom Paper Settings
Creating Custom Paper Settings
You can create and store up to 30 custom paper settings for use in printing on non-Epson paper or paper that is not supported by the Epson printer driver.
- Load the type of paper that you want to configure in the printer.
- Select Menu > General Settings > Printer Settings > Custom Paper Setting.
- Select a number for the custom paper setting. Note: You cannot change paper setting information registered using the printer driver or other software using the LCD screen.
- Select Change Reference Paper.
- Select a paper preset that is similar to the paper that you loaded following these guidelines:
- Photo paper: Baryta
- Glossy paper: Photo Paper or Proofing Paper
- Thick, non-glossy paper: Matte Paper
- Thin, soft, non-glossy paper: Plain Paper
- Cotton paper with a rough surface: Fine Art Paper
- Special media such as film, cloth, poster board, or tracing paper: Others
- Select Advanced Paper Settings and enter a value for the following settings:
- Paper Thickness
- Roll Core Diameter (roll paper only)
- Paper Feed Offset (leave at 0 unless you see horizontal banding)
- Select any additional settings in the Advanced Paper Settings menu, as necessary.
After you create a new custom paper setting, it will appear in the list of available paper types.
Note: You can also use Epson Media Installer to create custom paper settings.
Parent topic: Media Handling